
Choosing the correct lumber is the first step towards a successful woodworking project. But it can be tricky and even intimidating. In this article, we intend to cut through the chaff and explain exactly what to look for when choosing wood.
Learning this is an important milestone to being able to call yourself a woodworker. The right choice of lumber/timber will look better, be dimensionally stable and will save you time in the workshop.
First of all, what is the difference between lumber and timber? In the UK and Australia, both the felled tree and sawn wood is called timber. In the United States and Canada, sawn boards are called lumber. That is, unless they are greater than 5 inches in diameter, then they are called timber. It’s all a bit pedantic to be honest. In general, timber and lumber can both be used interchangeably for wood from a felled tree that has been processed.
You may also be interested in our article about the different types of wood used in woodworking.
The Sawmill
There’s no avoiding it, we need to understand the sawing process and the different parts of a tree. Why? Well, because it explains how each board is different and where it is best utilized. Understanding this seriously up your game as a woodworker.
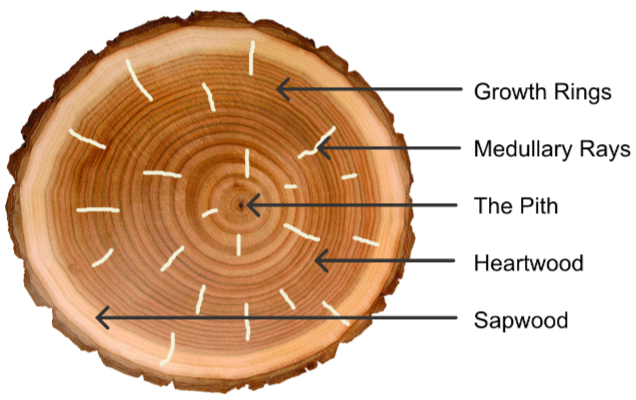
Growth Rings represent the outer circumference of the tree during each year of its life. The orientation of these rings when cut determine the stability and look of the timber.
Medullary Rays are rays that emit from the center of the tree like bicycle spokes. These are most evident on Quartersawn Oak, though it is also evident on other timbers.
The Pith is the center of the tree and not generally stable or strong. You should not use this for woodworking.
Heartwood is the best timber for woodworking.
Sapwood is on the outside circumference. This tends to absorb moisture from the environment more readily and hence is not ideal for woodworking. It can be used if you ensure it is dry before starting and then the piece is fully sealed once finished.
Where to Use Each Cut
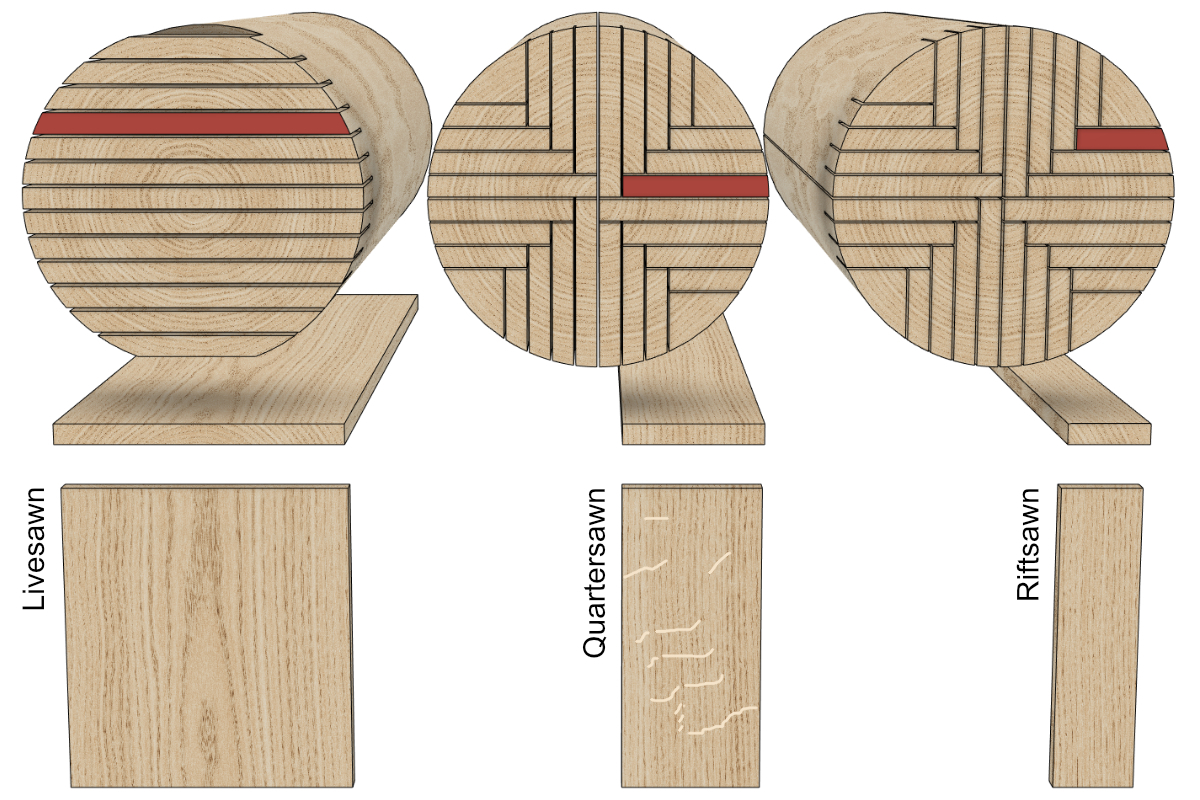
As a woodworker, you only need to be concerned with what is referred to as a Livesawn, Quartersawn and Riftsawn lumber/timber. These terms refer to the orientation of cut through the grain and therefore its strength, stability, and aesthetic characteristics. Let me explain…
Livesawn
The fastest and most efficient way to cut timber, often produces wider boards than the other options. This is called Livesawn in hardwoods and Flatsawn in softwoods. Can be unstable and prone to cupping. The grain is attractive and featured with a cathedral or crown pattern.
Plainsawn is much the same, though the grain might be a little less featured but a little more stable.
Quartersawn
Wood that is cut perpendicular to the growth rings from 45˚ to 90˚ to the wide face of the board. This is called Quartersawn in hardwoods and Vertical-Grain in softwoods. Produces a stable board that is resistant to warp, twist or cupping. The grain can vary in aesthetic from unfeatured to a medium feature with visible fleck, ray fleck or figure patterns naturally created from the medullary rays.
Riftsawn
Wood that is cut so that growth is 30˚ to 60˚ to the wide face of the board. This is called Riftsawn in hardwoods and bastard-sawn in softwoods. This cut is stable but can be prone to twisting. The grain will be linear and straight that is consistent on all four sides.

In the real world, that means using the lumber as illustrated. Using Riftsawn timber on the table legs because it is stable, and the grain will look consistent from all sides. Using Quartersawn timber on the apron because it is strong and stable, so will help resist any warping coming from the tabletop. Finally using Plainsawn for the tabletop because it is the most aesthetically appealing.
Below is a helpful video that explains all that is written above in a very clear way.
At the Lumber/Timber Yard
- First off, you are best to avoid the big box stores. While these stores are great for some things, the wood they sell tends to be construction grade rather than woodworking grade. That means knots, cracks, warp, voids and so on. Also, it tends to be more expensive and less selection.
- Take a measuring tape and moisture meter if you have one.
- Have a plan of what you are looking for.
- Take your time. It can take a while to find the perfect piece and spending the time now will pay dividends later.
- Speak to the staff about what you are looking for and see if they can make suggestions.
Decide on the Type of Wood Species
This will take some consideration as there are so many types of timber; from Pine to Oak to Rosewood. We have a whole article here on the best wood species for woodworking.
Look for Defects

Pay close attention to defects, these could cause you problems later.
Twist
This can be one of the hardest things to get rid of, so you really want to avoid boards with twist. You can check a board for twist by ‘sighting’ it. Look down the boards face from one end, if it’s flat, it’s probably good. If you see it corkscrewing, best put it back on the shelf. This is particularly important with thinner boards.
Cup
You can check for cupping, but placing a straight edge on the board, across the grain. If the straight edge rocks, or it is bridging between from the sides, then the board is cupped. Use your judgment how acceptable this is and if it is right for you.
Bow or Crook
You can sight a bow’d board by looking down its edge. If it has a curve, then it’s bowed. If it’s straight then it’s good. You can remove Twist, Cup and Bow, but it can be wasteful to accomplish.
Shakes, Cracks or Splits
You don’t want to use wood with splits, so check carefully for them. You may also find that moist wood, will split as it dries.
Knots & Voids
These have little structural strength and can move differently or even fall out with seasonal movement. If you want a board with knots for character, make sure you know what you are taking on.
Moisture Content
For woodworking your timber needs to be dry. If it isn’t then it will dry out in your home which leads to movement. This will likely make your project look terrible.
Take a moisture meter to the lumber yard, and if possible place the timber wherever you intend to use it, for several weeks/months before starting your project.
In general, you are looking for a moisture content somewhere between 6-9%.
Note that construction timber is usually only dried to 19%.
How does it Look
Find the nicest looking board. If you are going to need multiple boards to complete your project, maybe you’ll want some to match. Get the right ‘cut’ for your project (painsawn, riftsawn, quartersawn) and get the right part of the tree (heartwood).
It’s probably also worth saying, that every bit of wood can be used in the right application. But, you should know what you are getting yourself into before making the purchase and make sure whatever you get best suits your need.
Take your time here and be fussy!